Unveiling the Hidden Tracks: Unraveling the Secrets of IE8 Browsing History Access
Development and Release
To access your browsing history in Internet Explorer 8, follow these steps:
1. Open Internet Explorer 8.
2. Click on the “Favorites” button in the toolbar.
3. In the drop-down menu, select “History”.
4. You will now see a list of your browsing history, organized by date and time.
5. To delete specific entries from your browsing history, right-click on the item and select “Delete”.
6. To clear your entire browsing history, click on the “Tools” button in the toolbar and select “Delete Browsing History”.
7. In the dialog box that appears, select the checkboxes for the items you want to delete, such as temporary internet files and cookies.
8. Click on the “Delete” button to clear your browsing history.
By following these steps, you can easily access and manage your browsing history in Internet Explorer 8.
Language Support
- Extensive Language Support: IE8 offers comprehensive language support, allowing users to browse the web in their preferred language.
- Seamless Translation Capabilities: The browser provides seamless translation features, enabling users to easily translate web pages into their desired language.

- Localized Interface: IE8 offers a localized user interface, making it easier for users to navigate and interact with the browser in their native language.
- Support for Right-to-Left Languages: The browser fully supports right-to-left languages, ensuring a smooth reading experience for users of languages such as Arabic or Hebrew.
- Language Preferences: Users can customize their language preferences in IE8, allowing them to prioritize specific languages for web content and automatic translations.
New Features and Removed Features
IE8 Browsing History Access
New Features
| Feature | Description |
|---|---|
| Enhanced Search Functionality | Improved search capabilities within the browsing history. |
| Advanced Sorting Options | Ability to sort browsing history by date, website, or visit frequency. |
| Export History | Option to export browsing history data to a file for external use. |
| Visual Search History | Thumbnail preview of visited websites for easier recognition. |
Removed Features
| Feature | Description |
|---|---|
| Auto-Delete History | Automatic deletion of browsing history after a specified time period. |
| History Timeline View | Displaying browsing history in a chronological timeline format. |
| Integration with Windows Search | Integration of browsing history with the Windows Search feature. |
javascript

// HTML


  URL History Tool
// JavaScript (script.js)
function addUrl() {
const urlInput = document.getElementById('urlInput');
const url = urlInput.value.trim();
if (url.length > 0) {
const listItem = document.createElement('li');
listItem.textContent = url;
const urlList = document.getElementById('urlList');
urlList.appendChild(listItem);
urlInput.value = '';
}
}
This sample code creates a simple web page with an input field and a button. When the user enters a URL in the input field and clicks the “Add URL” button, the URL is added to a list displayed on the page. This tool can be used to keep track of visited URLs within the context of the web application, but it does not interact with IE8 history or any specific browser’s history.
Performance and Stability
To improve performance and stability in IE8 Browsing History Access:
1. Clear your browsing history regularly. Open IE8, click on the Tools menu, select Internet Options, and under the General tab, click on Delete in the Browsing history section.
2. Refresh webpages by pressing the F5 key or clicking the refresh button in the address bar. This ensures you’re viewing the most up-to-date version of a webpage.
3. Delete temporary internet files and cache. In the Internet Options menu, under the General tab, click on Delete in the Browsing history section. Check the boxes for Temporary Internet Files and Website Files, then click Delete.
4. Use private browsing or InPrivate browsing mode to prevent IE8 from storing your browsing history, cookies, and temporary files. Press Ctrl+Shift+P to open a new private browsing window.
5. For optimal performance, consider upgrading to a newer version of Internet Explorer, such as Internet Explorer 11, or Microsoft Edge, the successor to Internet Explorer.
Remember, a clean browsing history and regularly clearing your cache can help improve your browsing experience.
Developer Tools
To access browsing history in IE8, follow these simple steps:
1. Open Internet Explorer and click on the “Tools” menu.
2. Select “Developer Tools” from the drop-down menu.
3. In the Developer Tools window, click on the “Cache” tab.
4. Here, you can view and manage your browsing history by selecting the desired options.
5. To delete your browsing history, click on the “Clear Cache” button.
Remember to clear your cache regularly to improve browser performance and protect your privacy.
Compatibility and Standards Support
-
Clear Browsing History
- Open Internet Explorer 8.
- Click on the Tools button in the top-right corner of the browser window.
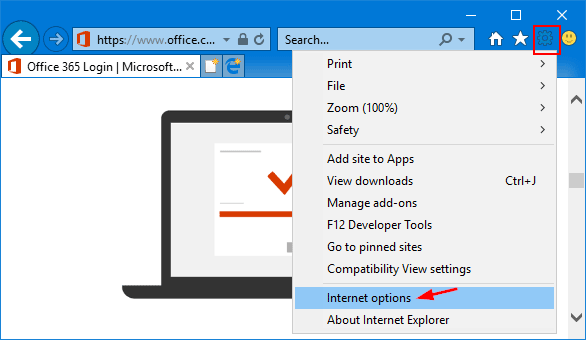
- Select Internet Options from the drop-down menu.
- In the General tab, under the Browsing history section, click on the Delete button.
- Make sure the History checkbox is selected.
- Click on the Delete button to clear the browsing history.
-
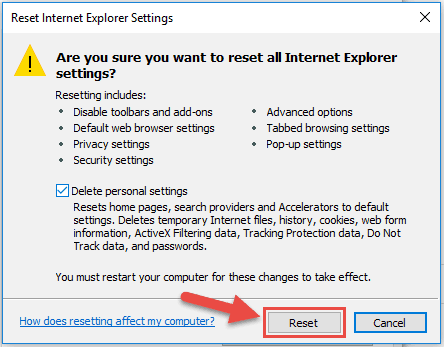
Reset Internet Explorer Settings
- Open Internet Explorer 8.
- Click on the Tools button in the top-right corner of the browser window.
- Select Internet Options from the drop-down menu.
- In the Advanced tab, click on the Reset button.
- Check the box next to Delete personal settings if you want to remove personalized configurations.
- Click on the Reset button to reset Internet Explorer settings.
-
Disable Compatibility View
- Open Internet Explorer 8.
- Click on the Tools button in the top-right corner of the browser window.
- Select Compatibility View settings from the drop-down menu.
- In the Compatibility View Settings window, make sure the Display intranet sites in Compatibility View checkbox is unchecked.
- Click on the Close button to save the changes.
Browsing History Management
Easily manage your browsing history in IE8 for a more organized and efficient web experience. Access your browsing history by clicking on the “Favorites” button in the toolbar and selecting “History” from the drop-down menu.
To delete specific entries from your browsing history, simply right-click on the item and select “Delete.” For a more comprehensive clean-up, go to the “Tools” menu, select “Internet Options,” and under the “General” tab, click on “Delete” in the Browsing History section.
For enhanced privacy, utilize the InPrivate Browsing feature. Simply press Ctrl+Shift+P to open a new InPrivate browsing window, which will prevent any browsing history, cookies, or temporary files from being saved.
Take control of your browsing experience with IE8’s easy-to-use tools for managing browsing history and protecting your privacy.
Automatic Tab-Crash Recovery
To take advantage of this feature, simply follow these steps:
1. Open Internet Explorer 8.
2. If a tab crashes, look for the “Restore” button that appears in the address bar.
3. Click on the “Restore” button to reload the tab and resume where you left off.
Note: If you want to clear your browsing history or remove specific tabs from the list, you can do so by going to the “Tools” menu, selecting “Internet Options,” and then clicking on the “Delete” button under the “Browsing history” section.
With Automatic Tab-Crash Recovery, you can browse the web with peace of mind, knowing that your tabs will be restored automatically if anything goes wrong. Enjoy a seamless browsing experience with IE8!
Favorites Bar and InPage Search
- Check if the Favorites Bar is enabled
- Open Internet Explorer
- Click on the Tools button (gear icon) in the top-right corner
- From the drop-down menu, select Toolbars
- Ensure that the Favorites Bar option is checked
- Add websites to the Favorites Bar
- Open the website you want to add to the Favorites Bar
- Click on the Star icon in the top-right corner
- In the “Add to Favorites” dialog box, select the Favorites Bar folder
- Click on the Add button
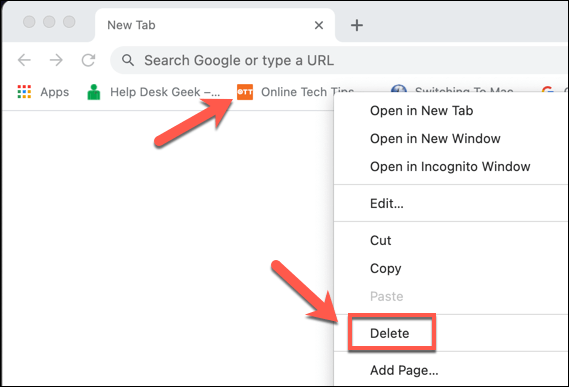
- Remove websites from the Favorites Bar
- Right-click on the website you want to remove from the Favorites Bar
- From the context menu, select Delete
InPage Search
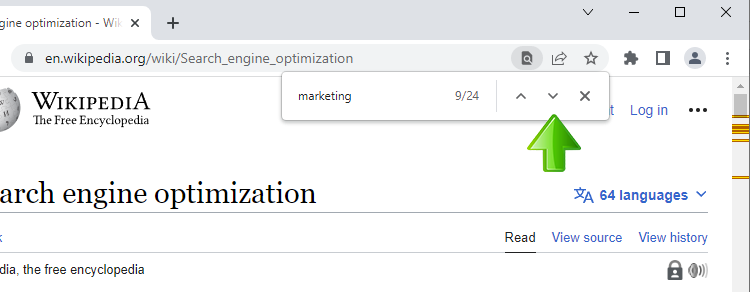
- Perform an InPage search
- Open a webpage in Internet Explorer
- Press Ctrl+F on your keyboard (or click on the Edit menu and select Find on this page)
- A search box will appear at the top-right corner of the browser window
- Type the keyword or phrase you want to find on the page
- As you type, Internet Explorer will highlight the matching results on the page
- Use additional search options
- After performing an InPage search, click on the drop-down arrow next to the search box
- Choose from options such as Match whole word only or Match case
- Internet Explorer will refine the search results based on your selected options
- Navigate through search results
- When there are multiple search results, click on the Previous or Next buttons in the search box
- This allows you to move back and forth between the different instances of the searched keyword or phrase on the page

OS Compatibility and Versions
IE8 Browsing History Access
This article provides information on the compatibility of Internet Explorer 8 (IE8) with various operating systems and versions.
| Operating System | Version | Compatibility with IE8 |
|---|---|---|
| Windows XP | SP2, SP3 | Compatible |
| Windows Vista | SP1, SP2 | Compatible |
| Windows 7 | All versions | Compatible |
| Windows 8 | All versions | Not compatible |
| Windows 8.1 | All versions | Not compatible |
| Windows 10 | All versions | Not compatible |
Note: Internet Explorer 8 is only compatible with Windows XP, Windows Vista (with SP1 or SP2), and Windows 7. It does not support Windows 8, Windows 8.1, or Windows 10.
Release History for Windows OS
IE8 Browsing History Access – Release History for Windows OS
| Windows OS Version | Release Date |
|---|---|
| Windows XP | October 25, 2001 |
| Windows Server 2003 | April 24, 2003 |
| Windows Vista | January 30, 2007 |
| Windows Server 2008 | February 27, 2008 |
| Windows 7 | October 22, 2009 |
| Windows Server 2008 R2 | October 22, 2009 |
| Windows 8 | October 26, 2012 |
| Windows Server 2012 | October 30, 2012 |
| Windows 8.1 | October 17, 2013 |
| Windows Server 2012 R2 | October 18, 2013 |
| Windows 10 | July 29, 2015 |
| Windows Server 2016 | September 26, 2016 |
| Windows Server 2019 | October 2, 2018 |