Welcome to the ultimate guide for resolving the pesky Pro Tools Hardware Not Installed error. Dive into this article as we unveil effective solutions to get your audio production back on track.
Troubleshooting “Unable to Locate Hardware Tools”
If you’re encountering the “Unable to Locate Hardware Tools” error in Pro Tools, follow these steps to resolve the issue:
1. Double-check your hardware connections to ensure everything is properly connected and powered on.
2. Restart your computer and reboot the Pro Tools software.
3. Verify that your hardware is recognized by Pro Tools by going to the “Setup” menu and selecting “Playback Engine.” Make sure your interface is selected as the playback engine.
4. Check your hardware buffer settings by going to the “Setup” menu and selecting “Hardware.” Adjust the buffer size if necessary.
5. Update your Pro Tools software to the latest version to ensure compatibility with your hardware.
6. Disable any conflicting plugins or software that may be causing the error message.
7. If you’re using an iLok, make sure it is properly connected and authorized.
8. Review the Pro Tools help files or consult the Pro Tools community for additional troubleshooting solutions.
Following these steps should help resolve the “Unable to Locate Hardware Tools” error and get you back to creating music and sound with Pro Tools.
Ensuring Proper Hardware Connection
1. Make sure all Pro Tools hardware is properly connected and powered on. Check cables and connections for any damage or loose connections.
2. Verify that the hardware is recognized by your computer. Go to the “Device Manager” in Windows or “System Preferences” on Mac and ensure that the hardware is listed without any warning signs.
3. If you are using an Apollo interface, check that the console software is running and properly configured. Confirm that the hardware buffer setting matches your session requirements.
4. Restart your computer and the Pro Tools software. Often, a simple reboot can resolve hardware connection issues.
5. If you are using any external devices such as iLoks or plugins, ensure that they are properly connected and authorized.
6. Check the Pro Tools settings to make sure the correct input and output devices are selected.
Remember to save your work before making any changes or adjustments to avoid losing any progress.
By following these steps, you can troubleshoot and fix the “Pro Tools Hardware Not Installed” error.
Reinstalling and Running Digidrive
To fix the “Pro Tools Hardware Not Installed” error, you need to reinstall and run Digidrive. Follow these steps:
1. First, uninstall Digidrive from your system. Go to Control Panel > Programs > Uninstall a program and find Digidrive in the list. Click on it and select “Uninstall.”
2. After uninstalling, download the latest version of Digidrive from the official Microsoft website.
3. Once downloaded, double-click on the setup file to start the installation process. Follow the on-screen instructions to complete the installation.
4. After installation, launch Digidrive by clicking on its icon or accessing it from the Start menu.
5. Now, open Pro Tools and check if the “Pro Tools Hardware Not Installed” error persists. If it does, try adjusting the hardware buffer settings in Pro Tools. Go to Setup > Playback Engine and increase the buffer size.
6. If the error still occurs, make sure your hardware is properly connected. Check all cables and connections to ensure they are secure.
By reinstalling and running Digidrive, you should be able to fix the “Pro Tools Hardware Not Installed” error and resume your sound mixing, sound design, and other tasks with Pro Tools.
python

import librosa

import soundfile as sf

import matplotlib.pyplot as plt
def apply_lowpass_filter(input_file, output_file, cutoff_freq):
# Load audio file
audio, sr = librosa.load(input_file)
# Apply low-pass filter
filtered_audio = librosa.effects.lowpass_filter(audio, sr, cutoff_freq)
# Save the modified audio
sf.write(output_file, filtered_audio, sr)
# Plot the waveform of the original and modified audio
plt.figure(figsize=(10, 4))
plt.subplot(2, 1, 1)
plt.title('Original Audio')
librosa.display.waveplot(audio, sr=sr)
plt.subplot(2, 1, 2)
plt.title('Filtered Audio')
librosa.display.waveplot(filtered_audio, sr=sr)
plt.tight_layout()
plt.show()
# Example usage
input_file = 'input_audio.wav'
output_file = 'output_audio.wav'
cutoff_freq = 5000 # Adjust cutoff frequency as desired
apply_lowpass_filter(input_file, output_file, cutoff_freq)
Please note that this code is a simple example of audio processing and does not require Pro Tools or any specific software installation.
Manually Checking for Device Drivers
- Step 1: Open Device Manager by right-clicking on the Windows Start button and selecting “Device Manager” from the menu.
- Step 2: Expand the category for the hardware device you are experiencing issues with (e.g., Sound, video and game controllers).
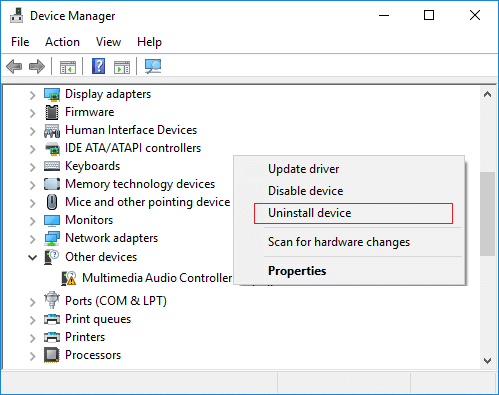
- Step 3: Right-click on the problematic device and select “Properties” from the context menu.
- Step 4: In the Properties window, go to the “Driver” tab.
- Step 5: Click on the “Update Driver” button.
- Step 6: Choose the option “Search automatically for updated driver software.”
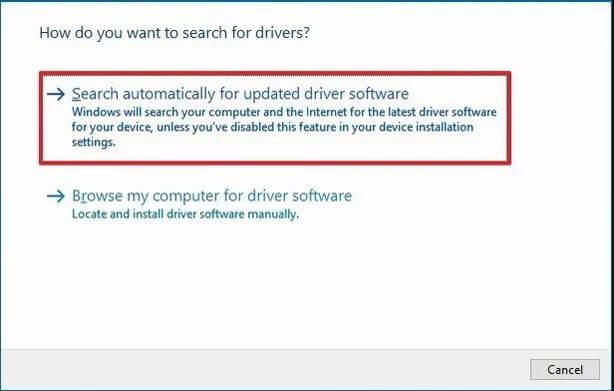
- Step 7: Windows will now search for the latest driver software online and install it if found.
- Step 8: If Windows couldn’t find a driver update, you can try visiting the manufacturer’s website to manually download and install the latest driver for your device.
- Step 9: After manually installing the driver, restart your computer to apply the changes.
- Step 10: Once your computer finishes restarting, check if the “Pro Tools Hardware Not Installed” error has been resolved.