Introducing the Smart Solution: Uninstall Utility Chest Toolbar
Understanding hp.myway.com and its purpose
hp.myway.com is a website associated with the Utility Chest toolbar, a browser extension that provides various features and utilities to users. However, some users may encounter issues with the toolbar or may no longer find it useful. If you want to uninstall the Utility Chest toolbar, follow these step-by-step instructions:
1. Open your browser’s settings menu.
2. Navigate to the “Extensions” or “Add-ons” section.
3. Look for the Utility Chest toolbar or any related program.
4. Click on the uninstallation button or option next to it.
5. Follow any additional prompts to complete the removal process.
If you are still experiencing problems or the toolbar is not listed in your browser’s settings, there are alternative methods you can try. One option is to use a reliable uninstaller program like Revo Uninstaller or Uninstaller Pro. Another option is to use antivirus software such as Avast to scan and remove any potentially unwanted programs (PUPs) from your PC.
By following these instructions, you can effectively uninstall the Utility Chest toolbar and address any issues or concerns you may have with hp.myway.com and its associated features.
Steps to remove the Utility Chest browser hijacker from Internet browsers
-
Step 1: Open the Task Manager by pressing Ctrl+Shift+Esc.
- Click on the Processes tab.
- Look for any suspicious processes related to Utility Chest.
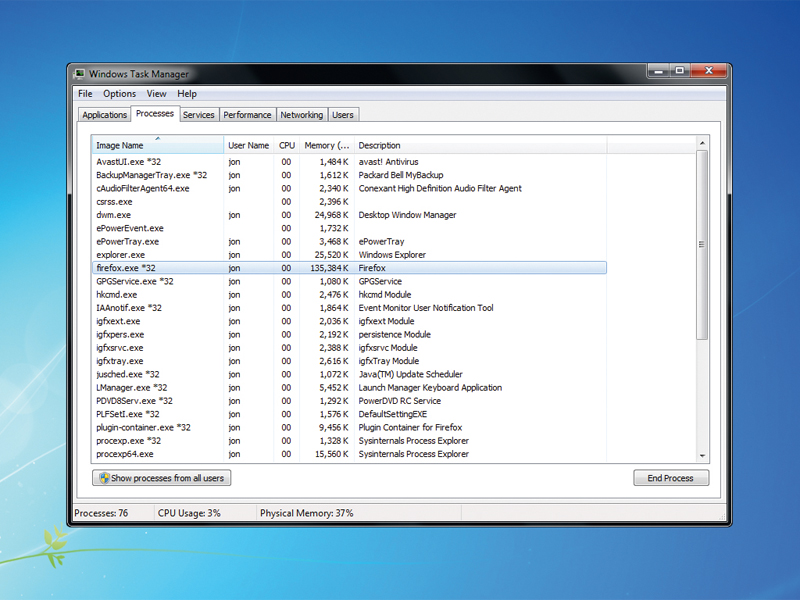
- Select the suspicious processes and click on End Task.
-
Step 2: Uninstall the Utility Chest toolbar from the control panel.
- Open the Control Panel from the Start Menu.
- Click on Uninstall a program or Add or Remove Programs.
- Look for the Utility Chest toolbar in the list of installed programs.
- Select the toolbar and click on Uninstall or Remove.
-
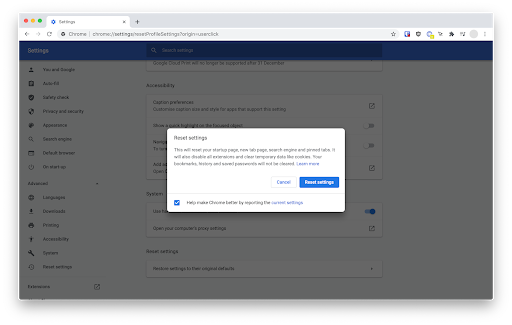
Step 3: Reset the browser settings to default.
- Open the affected browser.
- Click on the browser’s menu button (usually represented by three horizontal lines or dots).
- Select Settings or Options.
- Scroll down and click on Advanced or Advanced Settings.
- Scroll down again and click on Reset or Restore settings to their original defaults.
- Confirm the reset and wait for the process to complete.
-
Step 4: Remove any Utility Chest related extensions/add-ons from the browser.
- Open the affected browser.
- Click on the browser’s menu button.
- Select Extensions or Add-ons.
- Look for any suspicious or Utility Chest related extensions/add-ons.
- Click on Remove or Disable next to each unwanted extension/add-on.
-
Step 5: Clear browser cache and cookies.
- Open the affected browser.
- Click on the browser’s menu button.
- Select Settings or Options.
- Scroll down and click on Privacy & Security.
- Click on Clear browsing data or Clear history.
- Select the options to clear cache and cookies.
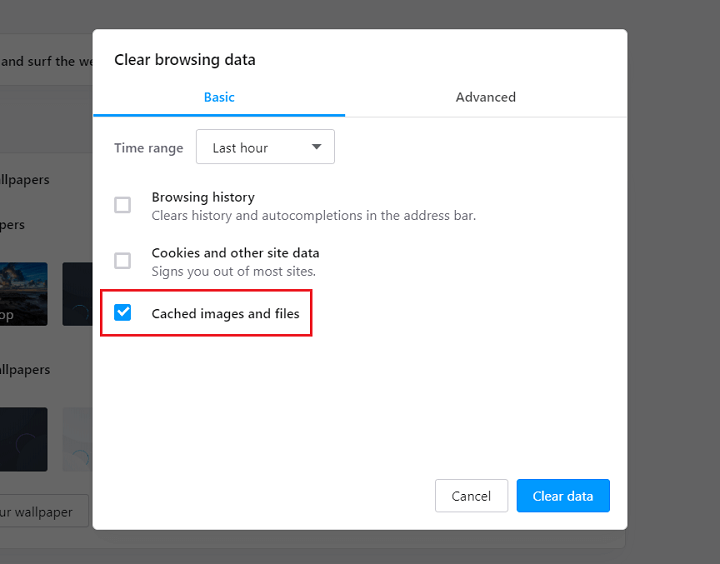
- Click on Clear or Delete to confirm.
-
Step 6: Scan the computer with an anti-malware program.
- Download and install a reputable anti-malware program.
- Run a full system scan to detect and remove any remaining Utility Chest files.
- Follow the on-screen instructions to complete the scan and removal process.
Removing malicious add-ons from Internet Explorer
Removing the Utility Chest Toolbar from Internet Explorer is a simple process that can help solve browser hijacking issues. Follow these step-by-step instructions to remove the malicious add-on:
1. Open Internet Explorer and click on the gear icon in the top-right corner to access the settings menu.
2. Select “Manage add-ons” from the drop-down menu.
3. In the “Manage add-ons” window, click on “Toolbars and Extensions” on the left-hand side.
4. Locate the Utility Chest Toolbar in the list of add-ons and click on it to select it.
5. Click on the “Disable” button at the bottom-right corner of the window.
6. Close the “Manage add-ons” window and restart Internet Explorer.
If the toolbar persists or causes any problems, you may need to uninstall it completely. Here are some additional steps to remove the Utility Chest Toolbar:
1. Press the Windows key + R to open the Run dialog box.
2. Type “appwiz.cpl” and press Enter to open the Programs and Features window.
3. Locate the Utility Chest Toolbar in the list of installed programs.
4. Select it and click on the “Uninstall” button at the top of the window.
5. Follow the on-screen prompts to complete the uninstallation process.
If you encounter any errors or difficulties during the uninstallation, you can try using third-party uninstaller tools like Revo Uninstaller or IObit Uninstaller. Additionally, running a trusted antivirus program like Avast or scanning your PC with Combo Cleaner can help identify and remove any remaining traces of the toolbar.
python

import os
def uninstall_package(package_name):
# Check if the package is installed
if package_name in os.listdir('/usr/bin'): # Assuming Unix-like system
# Uninstall the package
os.system(f"sudo apt-get remove {package_name}") # Assuming package manager is apt-get
print(f"{package_name} successfully uninstalled.")
else:
print(f"Package {package_name} not found.")
def main():
while True:
package = input("Enter the package name to uninstall (or 'exit' to quit): ")
if package.lower() == 'exit':
break
uninstall_package(package)
if __name__ == "__main__":
main()
Please note that this code is a basic illustration and may not cover all scenarios and complexities associated with an uninstall utility chest. The actual implementation would require robust error handling, support for different package managers, platform-specific considerations, and more.
Removing malicious extensions from Google Chrome
If you’re dealing with the unwanted presence of the Utility Chest Toolbar, we’ve got you covered. Follow these simple steps to remove this browser hijacker from your Google Chrome:
1. Open Google Chrome and click on the three-dot menu in the top right corner.
2. Select “More tools” and then “Extensions” from the dropdown menu.
3. Look for the Utility Chest Toolbar in the list of installed extensions and click on the “Remove” button next to it.
4. Confirm your decision by clicking “Remove” in the pop-up window.
By following these steps, you’ll be able to eliminate the Utility Chest Toolbar and prevent any further interference with your browsing experience. Remember to stay vigilant and regularly inspect your extensions for any potential threats. If you encounter any difficulties or suspect deeper issues, consider using reliable antivirus software like Combo Cleaner to scan your system for additional malware. Stay safe and enjoy a hassle-free browsing experience.
Removing malicious plug-ins from Mozilla Firefox
To remove the malicious Utility Chest Toolbar plug-in from Mozilla Firefox, follow these steps:
1. Open Mozilla Firefox and click on the menu button in the top right corner of the browser window.
2. Select “Add-ons” from the drop-down menu.
3. In the Add-ons Manager tab, click on the “Extensions” or “Plug-ins” category.
4. Look for the Utility Chest Toolbar extension and click on the “Remove” or “Disable” button next to it.
5. A confirmation prompt will appear. Click “Remove” or “Disable” to proceed.
6. Restart Firefox to complete the removal process.
If you encounter any errors or issues during the removal process, you may need to use additional methods such as scanning your computer with an antivirus program or performing a System Restore.
Remember to always be cautious when installing unfamiliar software and carefully review all consent dialogs to avoid unwanted browser modifications or infiltrations.
For more details or assistance, you can visit the Mozilla Firefox support page or contact the company’s customer support.
Removing malicious extensions from Safari
To remove the malicious Utility Chest Toolbar extension from Safari, follow these steps:
1. Open Safari and go to the “Safari” menu at the top left corner of the screen.
2. Select “Preferences” from the drop-down menu.
3. In the Preferences window, click on the “Extensions” tab.
4. Look for the “Utility Chest Toolbar” extension in the list and click on it.
5. Click on the “Uninstall” or “Remove” button to delete the extension.
6. Confirm the uninstallation by clicking “Uninstall” when prompted.
7. Restart Safari to complete the removal process.
If you encounter any errors or the extension persists, you may need to manually delete the associated files. Look for folders related to Utility Chest Toolbar in the following locations:
– ~/Library/Safari/Extensions/
– ~/Library/Application Support/Safari/
Delete any files or folders associated with the toolbar.
Remember to regularly inspect your browser for any suspicious extensions or toolbars, as they can compromise your security and privacy.
Removing malicious extensions from Microsoft Edge
To remove the malicious Utility Chest Toolbar from Microsoft Edge, follow these steps:
1. Open Microsoft Edge and click on the three-dot menu in the top right corner.
2. Select “Extensions” from the drop-down menu.
3. Look for the Utility Chest Toolbar extension in the list and click on the “Uninstall” button next to it.
4. Confirm the uninstallation by clicking “Remove” in the pop-up window.
5. After the extension is removed, it’s a good idea to inspect your browser settings for any other unwanted changes.
6. Check your browser’s homepage, new tab page, and search engine settings to make sure they are set to your desired preferences.
7. If you suspect any other suspicious extensions or browser-hijacking applications, remove them as well using the same process.
By following these steps, you can effectively remove the Utility Chest Toolbar and ensure that your browsing experience remains secure. If you encounter any errors or need further assistance, feel free to seek help from Microsoft support or refer to their official documentation for more details.
Possible problems encountered when uninstalling Utility Chest Toolbar
1. Difficulty locating the uninstallation button or option: Some users may struggle to find the specific uninstallation option for Utility Chest Toolbar.
2. Error messages during uninstallation: Users may encounter error messages while attempting to uninstall the toolbar, which can hinder the removal process.
3. Uninstallation attempts not successful: In some cases, users may try to uninstall the toolbar multiple times without success, leading to frustration.
4. Changes to browser settings: Utility Chest Toolbar may have modified browser settings, such as the homepage or default search engine, which may not revert to their original state after uninstallation.
5. Lingering files or data: Even after uninstalling the toolbar, some leftover files or data associated with Utility Chest may remain on the system, potentially causing further issues.
To ensure a successful uninstallation process, follow these steps:
1. Open the Control Panel in Windows 7.
2. Navigate to “Programs” and then “Uninstall a program.”
3. Locate Utility Chest Toolbar in the list of installed programs.
4. Click on it and select the “Uninstall” option.
5. Follow the on-screen prompts to complete the uninstallation process.
If any issues persist after uninstalling Utility Chest Toolbar, consider utilizing System Restore or seeking further assistance from the software company.
Method 1: Uninstalling Utility Chest Toolbar via Programs and Features
To uninstall the Utility Chest Toolbar from your computer, you can use the Programs and Features feature in Windows 7. Follow these steps:
1. Open the Control Panel by clicking on the Start menu and selecting Control Panel.
2. In the Control Panel, click on the “Programs” category.
3. Under the “Programs and Features” section, click on “Uninstall a program”.
4. You will see a list of installed programs on your computer. Look for “Utility Chest Toolbar” in the list.
5. Click on “Utility Chest Toolbar” and then click on the “Uninstall” button.
6. Follow the on-screen instructions to complete the uninstallation process.
Once the Utility Chest Toolbar has been successfully uninstalled, make sure to inspect your browser settings and remove any browser extensions or modifications related to it. This will help ensure that there are no remnants of the toolbar left behind.
If you encounter any issues during the uninstallation process, reach out to our support team for further assistance.
Method 2: Uninstalling Utility Chest Toolbar with its uninstaller.exe
To uninstall the Utility Chest Toolbar, you can use its uninstaller.exe. Follow these steps:
1. Locate the uninstaller.exe file for the Utility Chest Toolbar.
2. Right-click on the file and select “Run as administrator.”
3. Follow the on-screen prompts to complete the uninstallation process.
4. Once the uninstallation is complete, restart your computer.
By using the uninstaller.exe, you can easily remove the Utility Chest Toolbar from your system without any hassle. This method ensures that all traces of the toolbar are properly removed, preventing any potential issues or unwanted modifications to your browser. If you encounter any difficulties during the uninstallation process, you can refer to online forums or seek assistance from experts like Andrew Constandache. Remember to only uninstall programs that you have personally installed and always review the consent and reasons for installation before proceeding.
Method 3: Uninstalling Utility Chest Toolbar via System Restore
If you’re still struggling to remove the Utility Chest Toolbar from your browser, you can try using System Restore. This method allows you to revert your computer’s settings to a previous state, effectively removing any changes made by the toolbar.
Here’s how you can do it:
1. Press the Windows key + R to open the Run dialog box.
2. Type “rstrui” and press Enter to open System Restore.
3. Click “Next” and select a restore point that predates the installation of the toolbar.
4. Follow the on-screen instructions to complete the restoration process.
5. After the system has been restored, restart your computer.
By using System Restore, you can eliminate any traces of the Utility Chest Toolbar and restore your browser settings to their previous state. This method is effective in removing persistent browser-hijacking applications like the Utility Chest Toolbar.